Monday, June 13, 2011

Step 8: Railings and Stairs

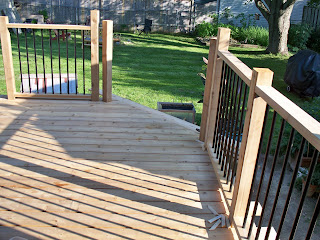
 Our initial thought regarding the railings were to have the 4 ft high section with a level 2x4 on the top. But as it turned out there was enough of the 4x4 railing posts to extend the posts a few inches above the 4 ft sections. This way we could put an additional 2x4 on top of the railing posts, for style points.
The first partially done section of railing. 
Each section may look equally space, but actually in some spots they are n't due to the way the railing posts had to be positioned with the joists. 
As a result of the way the railing posts are staggered, all the black picket section were individually measured and laid out. The pickets are consistently spaced within sections (bounded by 4x4 posts), but not consistent overall.   


Makeshift stairs. At least the stair stringers are attached... I think.

A few sections almost done (lacking the top railing detail)

Step 7: Railing Posts and Decking

I think we could really see the final design come to life when we got the posts for the railings in and some of the decking on. Before that it's hard to visualize what the completed project will look like.

4x4 posts for the railings were sandwiched between 2x8 joists and also screwed (x6) into the facing, exterior joist. It suffices to say that they weren't moving after all that. 
We started with corners, considering they're the static points and then filled in the remaining posts at more or less 4 ft intervals.


This was tricky. Here, there is a 4x4 that supports the railing (on the right) and one that will support the handrail for the stairs. This took some careful math (uh hum, holding the posts steady to see what would work). Also, we've put the exterior cedar face on the ugly green pressure treated. Looks much better.


The posts for the stair railing had to line up... they didn't... but they really were supposed to.
Another adventure in this project was running the PVC piping under the deck for the wiring for the exterior outlets. I inched my way under the deck securing the PVC with C-clamps to the bottom of the joists. I can't say it was my favorite job ever.  


Crawling under here with spiders and other various bugs: not as fun as it sounds!
Here Kevin is notching the first piece of decking to fit around the railing post


And I'm getting right up in his face with the camera...

Don't laugh, you're using power tools! Is that spit running off the pencil?


I love the drill. 

Stagger the decking boards... very important. Otherwise the join lines match up and just don't look right

Unfortunately the clothes line had to go. I suppose we could have left it... it would have been like some sort of odd wrestling match instigator: Clothesline and Deck vs. tall friends: who will win tonight? We're still looking for another spot to attach it, besides onto the house again

The first boards in place: just enough to walk on!

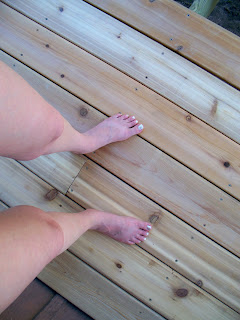
Summer feet swelling, but on new cedar decking!

Frodo takes advantage and makes himself right at home


More of the decking goes in and this is where we realize the difficulty in convincing wood to defy its warpy nature. 

To keep things simple we used nails as spacers. Wood does shrink a bit but we wanted to ensure that there would be room for drainage until that happens.


"I love the new deck... I also love chicken wings"

Almost done

The stairs will go here... 

Step 6: Pillars (piers) and posts

We came home from Las Vegas to find water filled holes and soggy sonotubes. The tubes, in some cases, were just barely keeping our new post holes from collapsing. We had to replace a number of the tubes and go in search of a bilge pump to get the water out of the holes... not an easy task considering it fills right back up again as soon as its pumped out!

With new sosnotubes and place and a spanking new wheelbarrow for concrete mixing, we set to work filling the tubes with wet, heavy concrete. I say we, but really it was Kevin doing the mixing and pouring. I added water, most often to the wheelbarrow, sometimes just to Kevin's clothes.

When the pillars had been poured we placed the metal post saddles in the wet concrete, attempting to visually line-up how our posts would line up to ensure that the beams were straight. Something we learned while doing this, that we were reminded of again and again during this project, is that despite best intentions sometimes holes don't line up, wood doesn't want to run straight, and math is confusing even when the problem at hand is right in front of us. Nonetheless, we did get the posts set in their saddles, carriage-bolted and nailed them in and got the beams placed, more-or-less in straight lines.


Judging the post height meant calculating the final height of the deck, subtracting the actual (not nominal) thickness of the materials and allowing for a slight decline towards the lawn for any water run-off. Not as simple as it sounds!

These are 6x6 posts (so 5 3/4 actual width) holding up 2 - 8x10 beams

As you can see measurement (for us) is not an exact science. We did correct this 


It's hard being a cat with no deck to lounge on. This is Frampton helping.

A finished post (in saddle), carriage-boted, with beam (in beam-cap saddle). At a few points we had to join beams on top of posts because the holes that were dug didn't exactly form a straight line. Joining the beams this way allowed us some play with the variance of the posts

With 2 - 8x10 beams straddling each series of  6x6 posts the foundation for the deck is sturdy
Once we had the beams up, joists were next. We started by creating one section of joists by connecting the outside pieces together to form a partial frame. We filled in the remaining joists one at a time.
Proper hardware is important, especially with pressure-treated wood: it will corrode hardware that is designed for non-pressure treated. These joist hangers made it easier to position the joists but we still contended with wood that refused to sit properly in the hangers. 
Our stairs run at a 45 degree angle to the rest of the (rectangluar) deck. That called for separate posts and beams to hold up the 45 degree portion


One section of joists almost done.
"Hey! Where'd the stairs go? How do I get down?"


Two sections of joists done and ready to be connected with a large, rather scary, tooted mending plate. 


In addition to the outward-facing mending plate (above), corner brackets hold the two sections of joists together 

Putting the finishing touched on the joists: hurricane ties! Extra structural support

Joists in place (and finally somewhere to sit!)


All the joists in place! And, the cats even get their own ramp


Step 5: Do something

An important lesson we've realized during the process of building a deck is: we are great at working together building a deck, bad at updating blogs.

So, in an effort to catch the blog up with the near completion of the deck, here are some pictures of the process (with photo captions):

Wood delivered and ready to go

Seemingly as soon as the wood was delivered and the holes drilled for the sonotubes (for the concrete pillars) we had to leave the country for a conference in Las Vegas... so there the wood sat and the holes rested until we got home and work could start.


Old deck is no more and the ground is leveled


Look at that clean space... 


Mr Post Hole (yes, that's actually his company name) arrives to start auguring our pre-marked post holes for the pillar supports for the beams. The holes are supposed to be at least 4 ft down (to get below the frost line) but our water table is so high that most, if not all the hole immediately filled with water and muck


Auguring is a two person job.... when the augur hits a rock the whole apparatus bounces. At one point the augur hit something buried beneath the surface (the old septic likely) and the back tires of the tractor lifted off the ground!


Our level ground is no more
Kevin cut the sonotube form for the pillars and put it in each hole to ensure they didn't collapse
I'm vainly trying to scoop out extra dirt from this hole. At one point I was stuck half-way down the hole until I realized  I couldn't really move my arms so scooping was impossible.